Things you would need –
A spare computer with loads of storage, or at least enough storage to meet your storage needs for a considerable amount of time. It can be installed with Windows 2000, XP or Windows Vista. (At home I am using a Pentium 4 desktop with 350GB Hard Drive, 1GB RAM, Wireless Network Card, Windows XP Pro SP2.)
Network, either wireless or wired, doesn’t matter. For better speeds, a wired network would be better. But if speed is not so much of an issue, then you could always rely on a Wireless Network, which is less of a hassle. I won’t cover details like how to get your network running and so on. That is beyond the scope of this document. If you are having issues with your network, please google around for your specific problem.
Download the following softwares and have them ready –
1. VisualSVN Server
2. Tortoise SVN Client
You can download both of them from here -
http://rapidshare.com/files/124185863/SVN_Client_Server.rar
Here on, I would like to call my SVN Server system as “SUBVERSION” and the SVN client system as “MYCLIENT”.
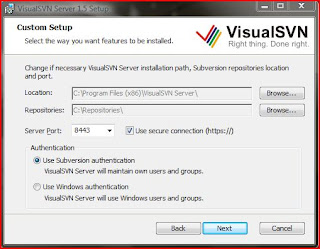
After you have downloaded the binary from the above mentioned location, you just have to double click on it and start the installer. The installation program is pretty straight forward and it would ask you some basic questions like the location where all your repositories would sit, just provide the location of a path, something like D:\myrepos. However make sure that you have sufficient storage in your D:\ to house your repository. Some other things that you would be asked during the install would be –
1. Authentication – I would rather suggest you to choose “Windows Authentication”, with this you can use the internal windows accounts as opposed to using a separate set of user accounts. If that doesn’t suit you, feel free to choose otherwise.
2. HTTPS or SVN, port number – It would ask you to choose a port number where you would like to run your SVN HTTPS listener. Default port number is 8443, you can keep the default in most cases.
I have appended a screenshot below for your reference. I hope this would help.
After the installation is completed, start the VisualSVN Server Management Console. Choose the Repositories pull down, right click and select New Repository. Type the name of your repository, something like, MyDocs and uncheck the check box. Look at the screen shot below.
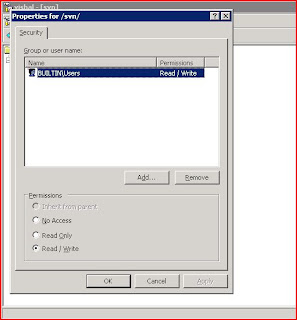
Now navigate to your repository folder, right click and choose Security. This would give you an option to assign permissions to your repository folder. Select your username and choose Read-Write. That’s is all the configuration that is required from your side on SUBVERSION.
After this come to MYCLIENT and install Tortoise SVN that you had downloaded earlier on. The installation program for this is pretty straight forward. Just choose the default values and it should suffice your needs. In some cases it might ask you for a reboot. Do so if it asks. In most cases it shouldn’t.
Now create a folder in your local drive (choose a partition that has sufficient place to house your data), something like c:\mydata. Right click on that folder and choose “SVN Checkout”. After this a dialogue bow like below would appear. Key in your URL there, it would be something like https://SUBVERSION:8443/svn/MyDocs. After this it would ask you to accept a certificate, choose accept it permanently, and key in your username and password and choose save password checkbox. That’s all. After all of this is done, you should see a tick mark on your c:\mydata. This signifies that your local copy is updated with the server. Copy in all your data in this drive or create all your works in this folder only here on. And whenever your day closes, perform an SVN Commit to commit all the changes on the SUBVERSION system. If you choose to have multiple locations to house your data, create as many repositories on the SUBVERSION box and map them with your local folder on MYCLIENT.
If any of you happen to face any problem with setting this up, please feel free to leave a comment. I would be happy to help (if my time permits).
Categories
- HOW-TO's (1)
- SubVersion Basics (2)
- Windows (1)
Not Found Here?
Sunday, June 22, 2008
How-To Setup your SVN Server & Client on Windows
Posted by
Vishal Sharma
at
1:12 AM
0
comments
![]()
Labels: HOW-TO's, SubVersion Basics
Wednesday, June 18, 2008
Why should you use SubVersion?
I believe that SVN (or for that matter any version control application) can be a useful tool not just for the developer community but for anyone who wants to have proper versioning and organization of their data. Whether it is music, photos, documents, presentations or anything else. I have been using SVN at home and office since quite some time now and I am able to conclude that it really helps me and my colleagues at office, organize and store their data in an efficient manner. I would list here some of the top benefits of using SVN for every computer user, whether it’s at office or at home.
1. Quick Versioning – Say for example you have been working on a proposal for a client and have made quite many changes to the document and each time, you have done a “Save As” of your document and appended a silly number to it for your understanding. I know it can get tedious after sometime, since even I have been through all this many times and in the end, you might just get confused with what’s there in what.
Well, this problem can be neatly solved if you are using an SVN system. The system is intelligent enough to track your changes and each change is assigned a revision number with a date and time stamp, so you end up having only one working copy at all times, but you can always switch to an older version of the same document if you choose to and again come back to the latest version without even doing any kind of “Save As” and getting into the messy game of giving your custom version numbers.
2. Easy Backup & Restore – I would always recommend you to have a separate system to host your SVN Server. So the problem of Single point of failure can be easily dealt with. Ideally you should have a separate system for you to use for your normal work and a separate system to host your SVN Server. Don’t think that you would need an expensive server grade system for this. Even your old laptop or desktop would just suffice. So in case your working system goes for a toss for any reason, and you have sync’d your data with the SVN Server, then it’s extremely simple to get your data back. All you have to do is restore your operating system, install the SVN client (I am using Tortoise SVN) and just perform a checkout. It’s that simple and all of your data will come back and sit on your system as if nothing had gone wrong. And yes, you will still have access to all the history that your data has gone through. Ain’t that amazing!
3. Easy for Collaboration and group Work – If you happen to work on something as a group, it’s very simple to check out what edits have been made by your team members and which one would you like to see. So referring back and forth is easy as sipping coffee. Without this, I am sure you would be exchanging emails with all the various versions of your data without knowing who has done what.
4. Handy tool for telecommuters – You either work from home or are constantly on the move. You can still always get the latest version of all your documents and works. At the same time, you can have a secure copy of all your data in case something goes wrong with your computer. SVN can be implemented typically on a web server with SSL encryption. So your data is transmitted over a secure connection. (Same kind of encryption that most banks use.) In some cases, you can even access all your data using just your web browser.
5. Quick reference to Historical Data, anywhere on any system – It pretty much works like Apple’s Time Machine. You can restore your data state dating back pretty long. And that too to any system. All you have to do is install the SVN Client and perform a checkout.
In my future articles I would be more technical, specific and HOW-TO style.
Posted by
Vishal Sharma
at
8:29 AM
0
comments
![]()
Labels: SubVersion Basics
Monday, June 16, 2008
My Need for Subversion ~ How it all started
After a careful analysis i have come to a conclusion that SVN would be an excellent tool for backup and versioning of desktop and laptops around my office. My users have data scattered all over their system and in the event of system failure, its a hassle to get the data back. Moreover, they keep travelling frequently and its kind of hard to get the latest versions of their documents (especially the sales and marketing folks) and emails at this stage gets a little messy. Over the last few months we have been thinking to implement a full blown Document Management System and some of my team members were even head start with exploring a few products. Then one fine day i just noticed my wife using SVN with TortoiseSVN for her documents and data (she works from home, so there is a greater need for her team to do proper versioning and data management) and i was amazingly impressed with it. Moreover i was all the more impressed after seeing the beauty of TortoiseSVN, which seamlessly integrates within the Windows Explorer. At that very moment, i knew this was the solution that i was looking for.
Without further ado, i started googling for SVN and i quickly learnt some concepts of it. It isnt much different than CVS (i had used cvs earlier on, so it was a lil easy for me).
After this i decided to create this blog and i would sharing all my experiences here. Hope it would be useful for some of you guys out there.
Posted by
Vishal Sharma
at
11:42 PM
0
comments
![]()
Labels: Windows


